
My Gargoyle Gecko Mansion
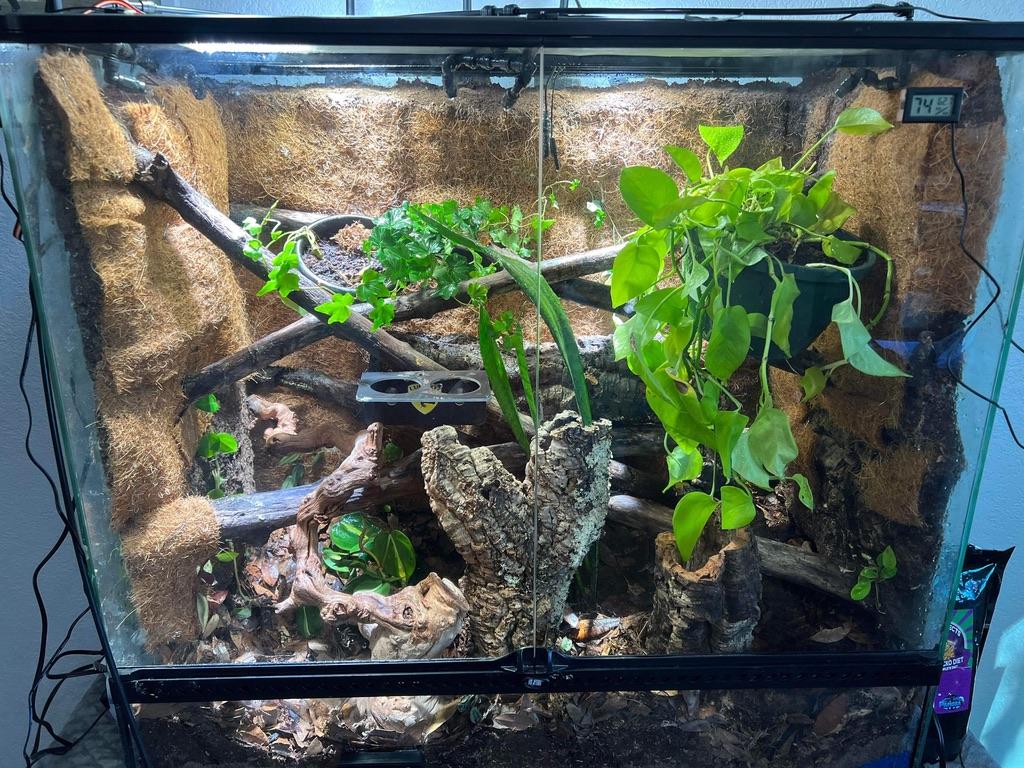
I recently built my first bioactive enclosure. I first got the idea after visiting my local reptile shop which had a couple set up. I got more enthusiastic about doing my own after joining some bioactive groups online and seeing all the bioactives that others had made. Below I have detailed my build. I pulled ideas from a lot of different sources rather than following any available guides 100 percent.
Supplies
Exo Terra Natural Terrarium Large/X-Tall (36” x 18” x 36”)
Assorted plants including Neon Pothos, Angle Wing Begonia, Philodendron
Powder Orange, Powder Blue, Dwarf White isopods
Great Stuff Window & Door Foam
GE silicone 1
Natural Reptile Bedding (only available in United States)
Coco Liner Sheet
Evercool 60mm x 15mm fan
Exo Terra Light Bracket (x4)
Large branches (x5)
Stainless steel wire and screws
From New England Herpetoculture:
Lighting Kit: 3 Jungle Dawn Spotlight LEDs with wire cage fixtures
ABG mix – 7 gallons
Leaf Litter – 2 gallons Live Oak
150-watt Ceramic Heat Emitter
Mist King Starter System and extra nozzles
Cork Rounds 16-18 inch (x2)
Background
I figured out where I wanted the 5 large branches to go and then used tape to hold them in place. I then applied the great stuff foam to attach them to the glass. After the foam for the branches was finished setting, I applied great stuff to the rest of the back and sides. I had to let the first layer set and then apply a second layer of foam to get the thickness I wanted (about an inch). After the foam on the back and sides was completely set, I used a combination of glass scrapper and sandpaper to remove the smooth top layer of foam. This was so that silicone would adhere better. Once the foam was all roughed up, I applied silicone in small sections on the sides which I put Natural Reptile Bedding on top of to give a natural look. On the back I applied silicone and put a large sheet of coco liner on top. I choose to also put some left-over coco liner on the sides which I did using stainless steel wire. I also attached a couple plastic pots to one of the top branches using stainless steel screws to hold plants.
Drainage Layer/Substrate
I used a mix of Zoo Med Hydroballs and Lugarti Premium Drainage Layer (this is only available in the United States) for the drainage layer. For the barrier between the drainage layer and substrate I used AC filter foam. I like the filter foam better than products like window screen or weed cloth because water passes through very easily. Additionally, the filter foam has so many layers that there is pretty much zero chance of dirt getting through. With weed cloth water can pool and not pass through very easily. With window screen the holes are a little big and dirt can get through unless you use multiple layers. For the substrate I used 7 gallons of ABG and 7 gallons of Natural Reptile bedding. I used a large amount of substrate because I wanted enough for big plants to take root and grow in comfortably. I believe most bioactive kits I have seen use around 7 gallons for a cage this size, so you don’t need to do 14 gallons like I did. Another thing I did is that I did not mix the two substrates together at all. I put all the Natural Reptile Bedding down first and then all the ABG on top of that. My reason for doing this is that the ABG is a substrate that has no dirt, and it is very airy, so water passes through easily and it is better for isopods. I put 2 gallons of oak leaves on top of the substrate. The leaf layer helps keep the enclosure humid longer, but the main reason is to feed the isopods.
Lighting and Heat
I have 3 Jungle Dawn Spotlight LEDs to keep my plants alive. In my opinion jungle dawn lights are some of the best plant lights for bioactives that you can get. Specifically, the spotlights are needed for tall enclosures. They are very powerful and can provide light to plants all the way at the bottom of the cage. They have a very long life, at 12 hours per day it works out to about 9 years if I did my math correctly. The lights even have built in fans to keep them from heating up and extend the life of the bulb.
I also use a 150-watt ceramic heat emitter. For crested geckos, gargoyle geckos, and other New Caledonia species you can keep them at room temperatures with no additional heat and they will be fine. However, Gargoyle geckos do enjoy some extra heat. My enclosure is very large, so it is possible to do a significant heat gradient. Heat gradients are important because reptiles cannot regulate their own temperature. A heat gradient allows reptiles to choose which temperature is comfortable for them at any given time throughout the day. The gradient in my enclosure is 10 degrees. At the top of the cage, I keep it 80 degrees and by the time you get to the bottom of the cage it is 70 degrees. I have the CHE attached to a thermostat in order to assure the cage doesn’t get too hot and the temperatures are consistent. Heat rises so I placed the probe at the back of the cage and just a couple inches from the top.
All the lights and the CHE are suspended about 4 inches from the top of the cage using Exo Terra Light Brackets. All the bulbs are housed in wire cage fixtures. I don’t use domes for any of them because this traps the heat making the lights more likely to break on top of not being very efficient.
Humidity
Gargoyle geckos drink water by licking it off surfaces. They can drink water out of a cup, and I recommend always having one available but that is not their primary method. Also, the many live plants in the enclosure need a good deal of water to survive as do the isopods. There is some disagreement when it comes to humidity levels for Gargoyle Geckos. Many care guides will tell you to mist twice a day (once in the morning and once at night) so that the enclosure reaches 90% or more humidity and let it get down to about 50% in between the mistings. Other guides will tell you to aim for a constant 75% humidity. I personally think the constant 75% is the way to go. This is easier said than done and I am still tinkering to get the perfect humidity levels.
I splurged and got a Mist King for my enclosure. With all the live plants and trying to keep the cage at 75% humidity all the time it is a worthwhile investment in my opinion. Currently I have it set to mist 3 times a day: 6am for 40 seconds, 12pm for 30 seconds, and 6pm for 40 seconds. When I first set up the cage I only had it misting twice a day for 30 seconds each. I will most likely have to adjust it a couple more times but for right now it is working well. I use a 5-gallon food grade bucket as the reservoir and fill it with reverse osmosis water. I use the reverse-osmosis water to avoid getting stains on the front glass doors.
To improve air flow in the cage I use a 60mm fan hooked up to a speed controller.
Plants & Clean Up Crew (CUC)
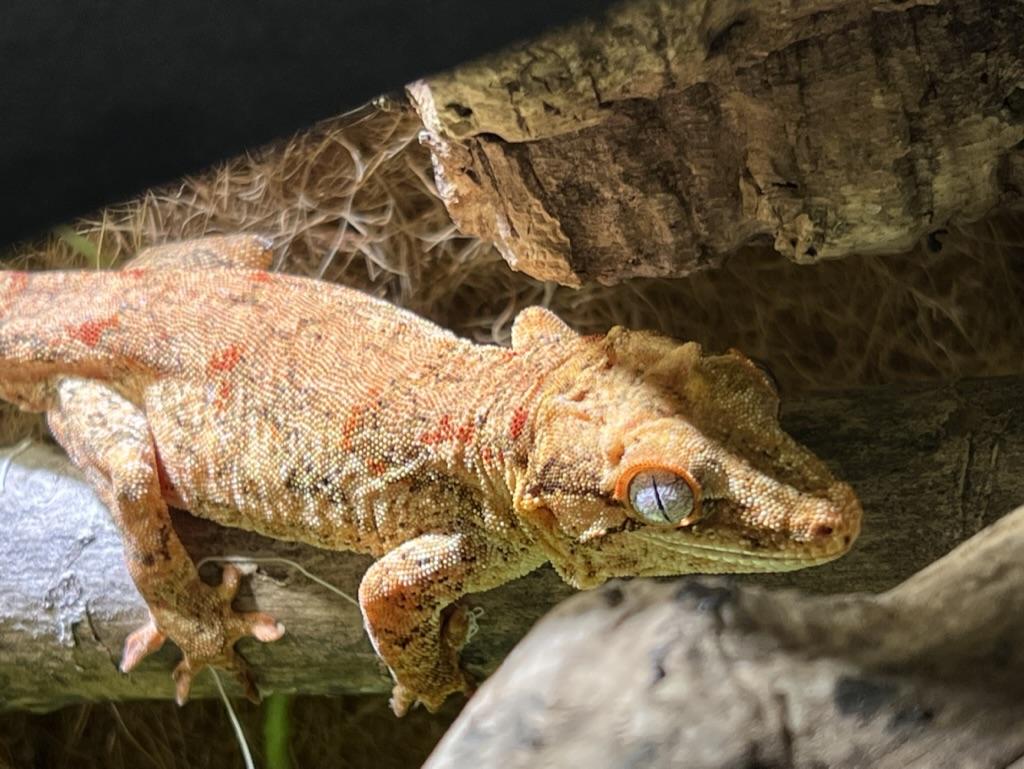
I spent a good chunk of change on plants. My initial plant order consisted of many less common terrarium plants and unfortunately, I did not have a good understanding of how they should be placed and their specific lighting requirements. Many of those plants did not make it so I recommend doing more research than I did on the plants you purchase. However, the plant order was quite large and most of the vining plants survived as did the larger plants. I replaced the ones that died with a large neon Pothos and a small Philodendron. Since I first set it up, I have moved certain plants and added new ones which I will probably continue to do on a semi regular basis. For gargoyle geckos plants really are just decorations for the most part, they really aren’t sturdy enough to climb and don’t provide anywhere to hide. My gecko spends all day in one of the 4 cork bark rounds I have placed on the right half of the cage. The way I designed my cage is that most of the plants are on the left side of the cage and all the cork is on the right side. The light wouldn’t really be able to make it through all the cork very well and this provides a spot where the soil is not as damp for the isopods.
For the CUC I went with powder blue, powder orange, and dwarf white isopods. There are a lot of different species you can get but these were readily available to me, and they do the job well! You don’t need a huge amount to start off because given the right conditions and plenty of food they reproduce quickly.
Overall, I am very happy with how the enclosure turned out and I learned a ton about building a bioactive. The process took a lot longer than I thought it would, but it was very enjoyable most of the time. The result is a cage that takes care of itself for the most part and the only thing I really must do is put in food and do an occasional extra watering.