[ad#300]
Building a naturalistic terrarium can be almost as enjoyable as caring for the animal that is to be put inside of it. The construction of these can be as simple or as complex as you choose. However in this article I will give a basic account of how we build the terrariums that house our breeders, babies and also the tanks that we offer for sale here at Tiki Tiki Reptiles. View the full photo gallery for this project on Photo Bucket here.
[ad#sponsor]
What will live in the mini environment?
The first step in building a terrarium is to figure out what will be living inside. The environment needed to properly house a Leaf Tail Gecko (Uroplatus) is very different from what will be needed for a Knob Tail Gecko (Nephrurus); as a result it is imperative that you know what you will be housing.
What environment needs to be created?
After you have figured out what you are going to be caring for it is now time to do a little research as to where the animal comes from so you can build a suitable habitat for it. In this article I will be constructing a terrarium for a Mossy Leaf Tail Gecko (Uroplatus sikorae), so I will need an environment that is heavily planted with lots of woody sticks for the geckos to perch on during the day. If I were constructing a terrarium for a different species, say a Lined Leaf Tail, I would use fewer plants and bamboo as they are native to the bamboo forests of Madagascar. Once you do a little research you can begin to gather what you need.
Getting what you need
I will now go over the things that I use to make our terrariums. You can build terrariums several different ways and this is one of many options; I believe that this way is cost effective, quick and affordable. You must start with your tank. You can purchase “terrarium” tanks from many large manufactures at pet shops the world over now, however I do not like the high cost of them or the sizes that they come in. I make my own tanks from scratch or simply convert a fish aquarium. In this DIY I will be doing the latter as they are easy to find, come in a wide variety of sizes and are fairly inexpensive. You are often able to find tanks for $1 per gallon at many of the chain pet supply stores.
Here is a list of things that you will need along with the tank (this is also the break down for this tank):
- 30G deep aquarium $30.00
- Tiki Terrarium Conversion kit (see below for details) $25.00
- Disposable gloves $8.00
- 1 can of Normal Great Stuff expanding foam. No need to get the super expand type. $6.00
- 2 tubes of Colored silicone (I recommend brown) $5.00
- Branches of varying sizes and shapes (variable cost or free)
- Hyrdroton Pebbles (expanded clay balls) $10.00
- Sphagnum moss, I prefer the New Zealand cream colored type. $10.00
- Organic soil $6.00
- Charcoal $4.00
- Coco fiber / bark of varying consistency. $12.00
- Various plants or cuttings around $20.00
- Blue painters’ tape $3.00
- Black spray paint $5.00
Once you have all of your items assembled you can start the construction of the tank.
Starting the build: background

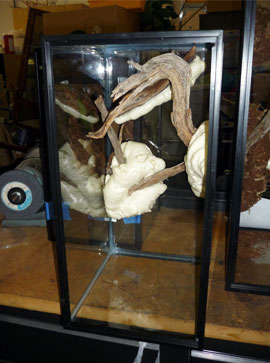
The first step is to give the aquarium a good cleaning to remove any nastiness that may have been picked up prior to its purchase. Once that is done place the tank upright. Begin to place the items that you want to include inside the tank where you want them to be. This can be cork flats, sticks, ghost wood, etc. This is your time to figure out what you want the finished terrarium to look like. Once you have settled on a pattern that you like, take the items and silicone them into place. Do not be afraid to use all dimensions when doing this: adding items to the sides, at angles, from the top etc. all add to the style. If sticks will not stay in place while the silicone is drying then use blue painters’ tape to secure them. Let the silicone dry for a few hours before you move to the next step so you do not dislodge anything.
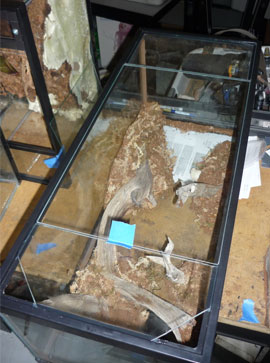
When the silicone is able to support the items that you have placed through the tank it is time make the seams disappear. Sticks or cork backgrounds suspended in the air just don’t look natural, however sticks coming out of dirt do. To make this illusion we use the Great Stuff expanding foam to add area at the attachment points. When working with great stuff it is important that you wear gloves! It can be easily removed from glass if you mess up, however getting it off your hands and clothes is nearly impossible. Another tip is not to overdo the foam. If you have not worked with it before you will be surprised at the amount that it will grow in 24 hours time. You can always add more, but taking it away is more difficult. Do one side at a time and by this I mean lay one side down, foam it, allow it to harden and then do the same with the back and other side if necessary. If you add the foam to the walls when vertical the foam may slide down and out of place as it cures. Patience is important during this part of the build. Something you can also do during this stage is add foam to random or empty areas giving your inhabitant more areas to perch itself on and more areas for you to plant vegetation on. Again, remember to wear gloves and don’t over-foam.
After allowing the foam to harden which should take a few hours (24 hours for a full harden) you can now cover the white foam with a blend of fine coco fiber and bark. Some people use only coco fiber and some people only use bark; I prefer to use both. The mixture of the fiber and larger chunks allows for all of the smaller cracks to get coverage and the bark bits give the background some texture. Prepared in a 5 gallon bucket, our mixture is somewhere in the neighborhood of 3 parts coco fiber to 1 part bark chunks. When you have your background media ready you can begin to apply it. This is done by taking GENEROUS amounts of brown silicone and applying them to the foamed areas, then dropping your background mixture onto the wet silicone one handful at a time and tapping it down a little. It is very difficult to go back after adding media onto the silicone so use more than you think you need, the more the better! Also, do one area at a time. If you silicone all of your foam at once you will be hard pressed to cover it all with media before it starts to dry. Another helpful tip for this stage is to wear a rubber glove and use your fingers to even out the silicone, getting it into all the nooks and crannies before you add in the media. Extra silicone will always mask the unnatural looking white foam.
Congratulations! You should have a complete terrarium background.
Covering the back
Since the terrariums are made of glass it is obvious that on the outside you can see the unsightly white foam and silicone that you tried so hard to cover on the inside. I always cover this as it adds greatly to the overall look of the terrarium. This is an easy step that if you wish can be omitted. You can do this two different ways: paint the entire back and sides or simply paint where you have foam and silicone. I prefer the latter as you can still see through the glass. If you want a totally covered background then use blue painters’ tape where you want the tank to be seen through and then spray the rest with black spray paint. Allow it to dry then apply a second and preferably a third coat of paint before removing the tape. The other method is just about the same however you will cover ALL the glass with tape and cut out the foam areas with a razor blade so the paint will only cover a small area.
Install the Conversion

We use Tiki Terrarium conversion kits to transform the aquarium into a terrarium. They feature swinging doors that can easily be removed if needed and upper corner air vents that minimize any visual obstructions. This is a new product that we are still developing, however you can purchase other similar kits from different vendors or simply make your own. If interested in a Tiki kit please feel free to contact us. Installation on these aquarium to terrarium kits is very simple: silicone the top and bottom pieces into place, silicone the door mount and then air vents — it’s as easy as that. Allow silicone to dry a few hours before moving on to the next step.
Adding in the Dirt!

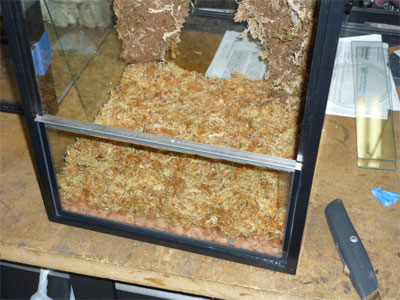
At this point you should have a nearly complete naturalistic terrarium; all you need to do is add in your earth and plants. When you add your substrate it is important to use layers so that extra water will drain down not letting your terrarium to turn into a bog. Start by adding 2-3 inches of hydroton. These are small clay balls that allow water to collect in the bottom keeping it out of your soil. You can also use aquarium rocks for this however they are costly and heavy! Some people separate the different layers with window screen however I prefer to use sphagnum moss as it really adds to the layered look from the outside. Dampen the moss and put an even layer on top of the hydroton. Once complete add a thin layer of carbon to filter the draining water, add another layer of sphagnum moss and then your top layer of soil. Keep in mind that you need enough soil to plant your plants in so try to get at least 5 inches of any organic type dirt on top.
Plants and Decoration
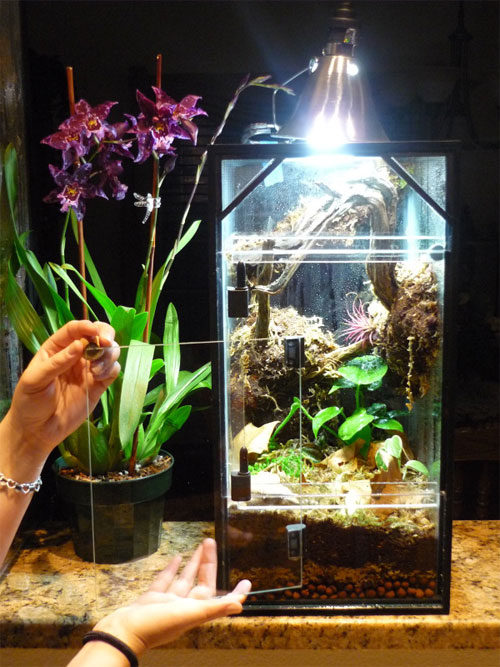
The last stage to completing your terrarium is to add in some plants to make it look alive. This can be done many different ways from planting cuttings, to seeding, ordering plants from online vendors, purchasing terrarium plants from reptile shows, your local home depot store etc. Try to use mini-plants that look as if they belong in your slice of jungle. Add some moss, dried leaves, vines, etc. This is another part where you can add as much as you want and let your own creativity be your guide!

Now sit back and enjoy your complete naturalistic terrarium! Allow everything to dry for a few days before adding anything into the terrarium; this will also give you a chance to make sure you like how everything turned out. If you have any questions please feel free to contact me at [email protected]
View the full photo gallery for this project on Photo Bucket here.


I love this tutorial. I want to make my own custom made terrarium but here i Holland i find it hard to find the right resources. This is a very handy list of materials.
We’re happy you found the DIY post useful, Lisa! The post turned out great, big thanks to Chad for sharing it with our readers!
These are small clay balls that allow water to collect in the bottom keeping it out of your soil. You can also use aquarium rocks for this however they are costly and heavy! Some people separate the different layers with window screen however I prefer to use sphagnum moss as it really adds to the layered look from the outside.
Im having a hard time trying to find these products for the soil, such as clay balls. I was wondering where u got yours from?
Either order online from http://www.blackjungle.com or find a local hydroponics store which should carry them.
I’m fascinated along with thinking about what you really are covering right here.
I have a 75 gallon tank that I plan on turning into a terrarium, but no reptiles are animals will inhabit my tank. Can you tell me how this should differ from what you’ve made? How do I keep the soil from smelling? what plants would grow best in this terrarium as I plan to use it as a night light at night.