

Tub or viv? It’s one of the questions that comes up time and time again in the reptile hobby. It’s a question that polarizes some keepers and most people will have an opinion or preference one way or the other. Indeed, Gecko Time has previously covered the topic as part of the Pros and Controversies series, with readers on both sides of the fence.
Now though, I feel I have come close to achieving a great compromise between the two. Taking the positives from tubs and the positives of vivs, I have merged the two together to create a gecko enclosure that works well for both the keeper and the animal. Here, I want to outline how I’ve gone about my design and why I chose to do this. I’ve not done anything groundbreaking — it’s pretty simple and logical — but I hope it’s helpful if you’re looking to change up how you keep your geckos. Please feel free to leave any questions and comments!
Tub vs. Viv
Let’s briefly recap the differences of tubs and vivs. What are the pros and cons of each? Vivs tend to be larger, giving the gecko more space. They are mostly front opening and lighting and heating fittings can therefore be fitted in or over the top. Coupled with the size this makes them a favorite amongst those who want a more natural environment for the animals in their care. They can add deep substrate layers, basking platforms and so on. However, all this adds weight to an already fairly heavy structure. Awkward if you want to move things around. If you have a large collection, vivs can start to use up a lot of space, which is why many keepers go for tubs in racks. They’re light, easily slotted into a shelf unit and cheap. But, there’s a negative side. The racking system often generates a pack ‘em in mentality, with little attention paid to the space each individual is given. The tubs are also top opening, meaning the only way to heat them tends just to be with some form of under tank heater, the benefits of lighting and overhead heating tricky to incorporate. The fact that the tubs often need to be pulled in and out limits the weight of any decor, so they’re fairly inflexible if you want to have something a little more than paper towel, water bowl and hide. Finally, if you want to view your animals this is much easier with a viv, although when it comes to nocturnal/crepuscular species you might not be able to see them anyway!
New Heat and Light Decisions
So, why did I decide to make a change to the way I was keeping my critters? After hearing more and more owners reporting positives from using UV and bioactivity with nocturnal geckos (Coleonyx variegatus, Eublepharis macularius, Teratoscincus scincus in my case) I decided to look further into the subject. After reading some books, studies and doing a lot of research, I concluded that although there was nothing drastically wrong with my care, it could be a lot better. Previously, I was using some glass and some wood vivs. They were kitted out with a heat mat on one side, controlled by an on/off thermostat. They included a basic naturalistic setup with sand, rocks and a couple of hides. I provided very little opportunity for the geckos to climb, should they wish.
What I wanted was to move away from the heat mats and use overhead heating, I also wanted to have a nighttime drop. This replicates nature more closely, which I wanted for the animals. Encouraged and inspired by my research I also decided to use UV. I had one eye on live plants and bioactivity and although I have thrown in some springtails, I’ve not added live plants…yet. So, in the short run, I wanted these enclosures to provide a step up in my husbandry. In the long run I hope to build more which might hold groups of Coleonyx and Paroedura species.
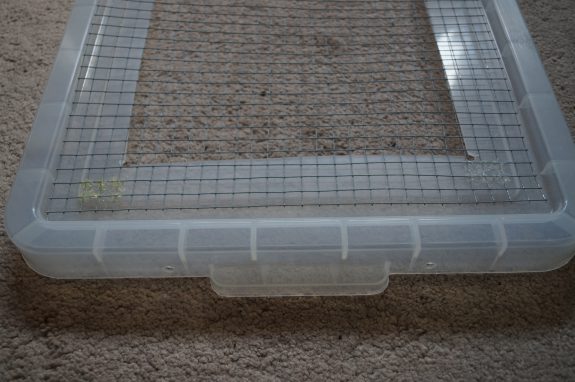
I’m using 64l Really Useful Box tubs which are 71x44x31cm (LxWxH). I cut out the centre of the lid then glued the mesh onto the remaining edge. This provides all the ventilation it needs.
One of the negatives of this design of tub is that the weight means that they can only be pulled in and out on floor level. This is fine for my set up as I have shelves for vivs above them, so I don’t need to stack them. It would be tricky if you wanted to install them into a rack. It would be possible if you left enough room between shelves, though.
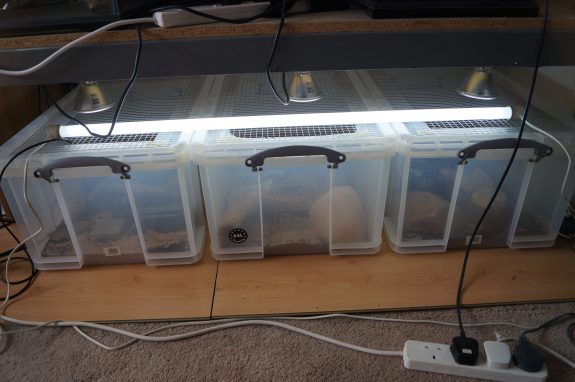
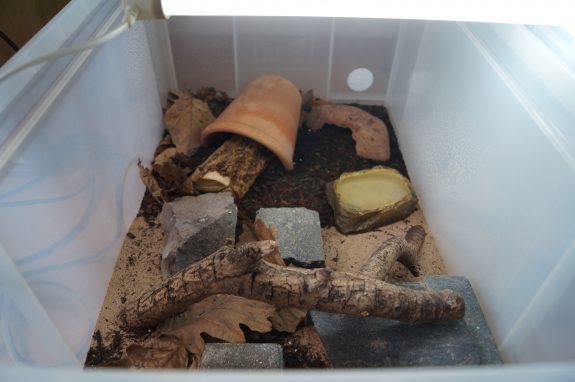
The design is fairly straightforward. For the heating I used an Arcadia Deep Heat Project (DHP) above each tub. This is a fairly new product which produces IR-A (Infra red) and IR-B to heat furnishings. These wavelengths are more natural than the IR-C produced by ceramic heaters. As these tubs sit under my shelf unit I just screwed the DHP fitting to the underside of the shelf, leaving enough room to be able to remove the tub’s lid. For the UV I used an Arcadia 6% T8 unit across all three tubs. I was looking to achieve a UVI of up to 1 (Ferguson Zone 1), so I don’t need a reflector as at this distance the lamp is strong enough without. The mesh I’m using is very wide (cm square) so it has very minimal effect on the UV. The UV and DHP both sit at one end to create a temperature and lighting gradient. Once they were in place I built up substrate, slate and branches underneath so that the animals can move between different levels of light and heat. All the decor, but particularly the slate, will absorb the heat during day. When the DHP turns down at night the slate will still be warm, like in the wild after the sun sets. I’m using a microclimate evolite as my thermostat and it also controls the night time drop.
Initially, I was struggling to get the temperature up to the 32 – 34c I was looking for (about 90 -95f). I put this down to my ambient room temperature being quite low, about 17c; this was during winter and I wasn’t heating my room very much. Most of my animals were dormant. As the temperature has warmed up (today it is at 25c), I have been able to easily achieve the desired levels.
I’m housing different species in each tub so there are some minor differences in design between them. For example, my old female Leopard Gecko has a large branch base for her to bask on, whereas the Coleonyx Variegatus is much smaller and agile (in comparison anyway!) so he has smaller branch and rocks to climb on. The Teratoscincus scincus prefers to burrow so he has a deeper substrate.
Room for Improvement
What didn’t go so well?! On one of lids the mesh has come detached because I wasn’t liberal enough with the glue gun, so make sure you give it plenty with the glue gun and it’ll be ok! If I underdid it with the glue gun I overdid it with leaf litter. I really like how leaf litter looks but for the leopard and the teratoscincus they were too big to hide under it and they wouldn’t walk over it! They just avoided it! I’ve taken out most of it now so they can use the space. The Coleonyx is small enough to hide underneath so I’ve left the leaves in with him.
The addition of live plants and clean up crew would definitely make the tubs look better and benefit the animals. Before I can add that I will need some lights to help the plants live. There is space to fit them in so that will happen at some point.
Animal Behavior Change
Have I noticed any changes in the animal’s behavior since they moved into their new homes? Yes! There have been small but interesting changes. Firstly, they all make more use of the cold ends than they did before, even though the temperature range is pretty much the same. I believe this is because the warmth is now ambient, rather than just on the floor. It probably also has to do with the DHP producing natural IR-A and IR-B, making heat more naturally available to the animal. My face certainly gets warm when I feed and clean the cages!
I’ve also been impressed and somewhat surprised by the Coleonyx variegatus’ climbing ability. I put a branch in above the basking area so that he could get closer to the heat/light if he wished. Once the temperature drops at night he frequently climbs up to the top of the branch to get to the last of the warmth.
Thank you for reading! Let me know what you think in the comments! Is this the solution to the tub or viv debate? If you have any questions then please just ask in the comments! Huge thank you to Gecko Time for letting me write! If you have any ideas for future articles from the UK then let me know!
Thanks for sharing! These compact naturalistic enclosures are very cool.
Hi
This is a great article and I use something similar for some of my species of gecko. Just one tip, you can use aquarium silicone rubber rather than hot glue. It is little harder to use, but is more durable and doesn’t go brittle when exposed to UV as some hit glues can.
Best
Ian
Good article. I use the same wire mesh on my bins and I’ve found that 1/8″ rivets work very well rather then glue.
What temperature should the baby geckos home be
Remember that this isn’t a facebook group where people are looking at the site all the time. I check once a day every day, so it’s good to be patient.
Where did you get this house gecko from? If you got it out in the wild, the fact that you were able to catch it may mean that it was already not in good shape. I’m not a house gecko expert. Have you googled “house gecko care”? That will tell you a lot. If you want a quick response from me, please email me at [email protected].